When I was test driving the Sprinter van, both the ABS (Anti Lock Braking System) and ASR (Anti Slip Regulation) warning lights went on after a short drive. The seller of course explained that he had fixed this issue just days before and that he couldn’t understand why it’s coming back. Since I flew in to pick up the van and the seller also still had the replacement pump (and the price of the van was good) I decided to take the risk. Long story short: I drove the van about 7,000 miles without ABS, replaced the ABS pump and electronics from the spare unit I had twice without success. As it turned out, the previous owner tried to replace a malfunctioning ABS pump with another defective one.
The real fix however turned out to be pretty simple, technically speaking and surprisingly cheap – given that a Mercedes seller would charge you over $2000 for a new ABS system alone, not including labor for installing it. Much more cheaper are used ABS pumps that can be found on eBay (That will still run into below problem at one point if they haven’t been serviced before). Make sure you look for the right ABS unit, Mercedes used different part numbers through the model years and van types. The 2006 Sprinter 3500 part number for example is A0004465789 [@eBay]
The Mercedes specific ABS code that the scanner gave me was C1401 (ABS return flow pump) which led to the pump itself.
First, a simple test to check if the ABS pump is working is listening closely when you turn the ignition to position 2 (not starting the engine). You should hear the ABS pump motor spinning. This is the initial test that the van’s computer is performing to see if the ABS system is functional. If it doesn’t detect a running motor it won’t turn off the ABS warning light on the dash.
If you can’t hear the ABS pump making some noise the next step would be to apply 12V directly to the pump motor to see if the problem is in the electronics or wiring to the ABS pump or the pump motor itself. The ABS pump is accessible from the top of the engine bay and even better if you remove the driver side head light (for left hand drive Sprinters) – the arrow in the picture below points to the ABS pump.
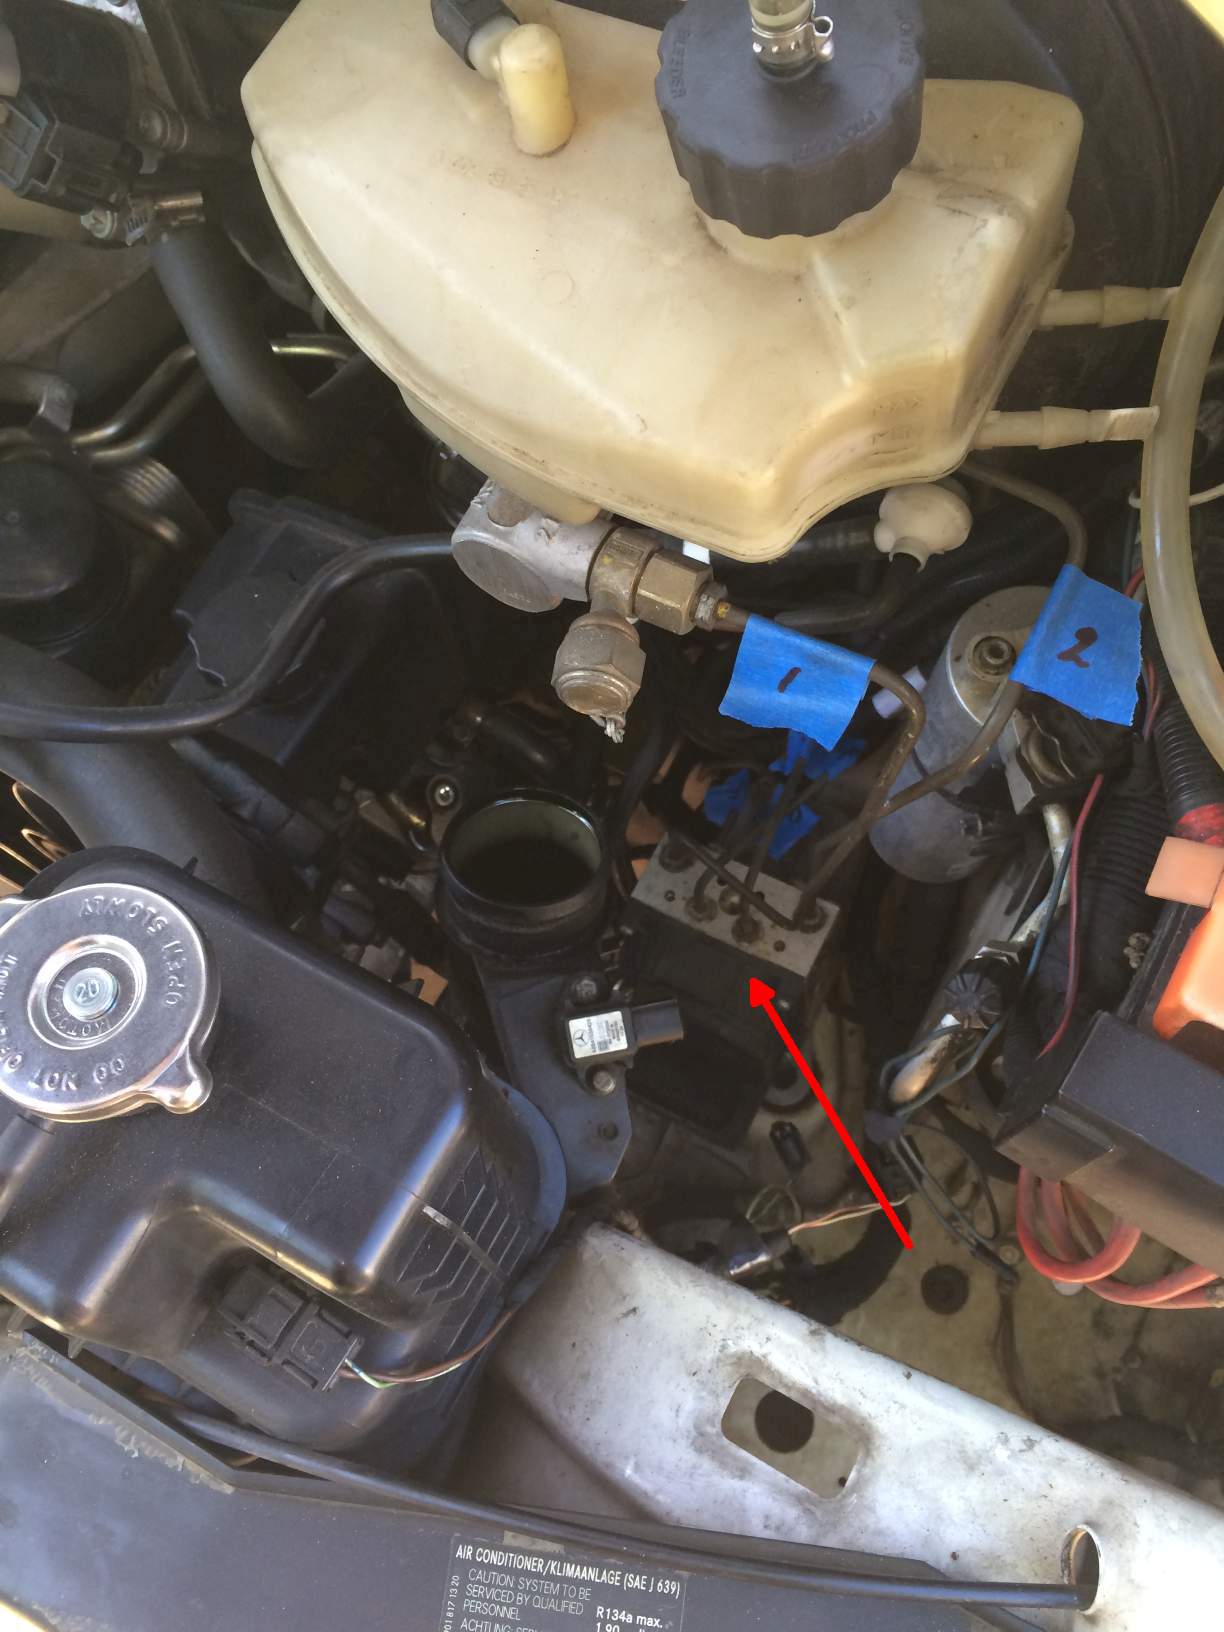
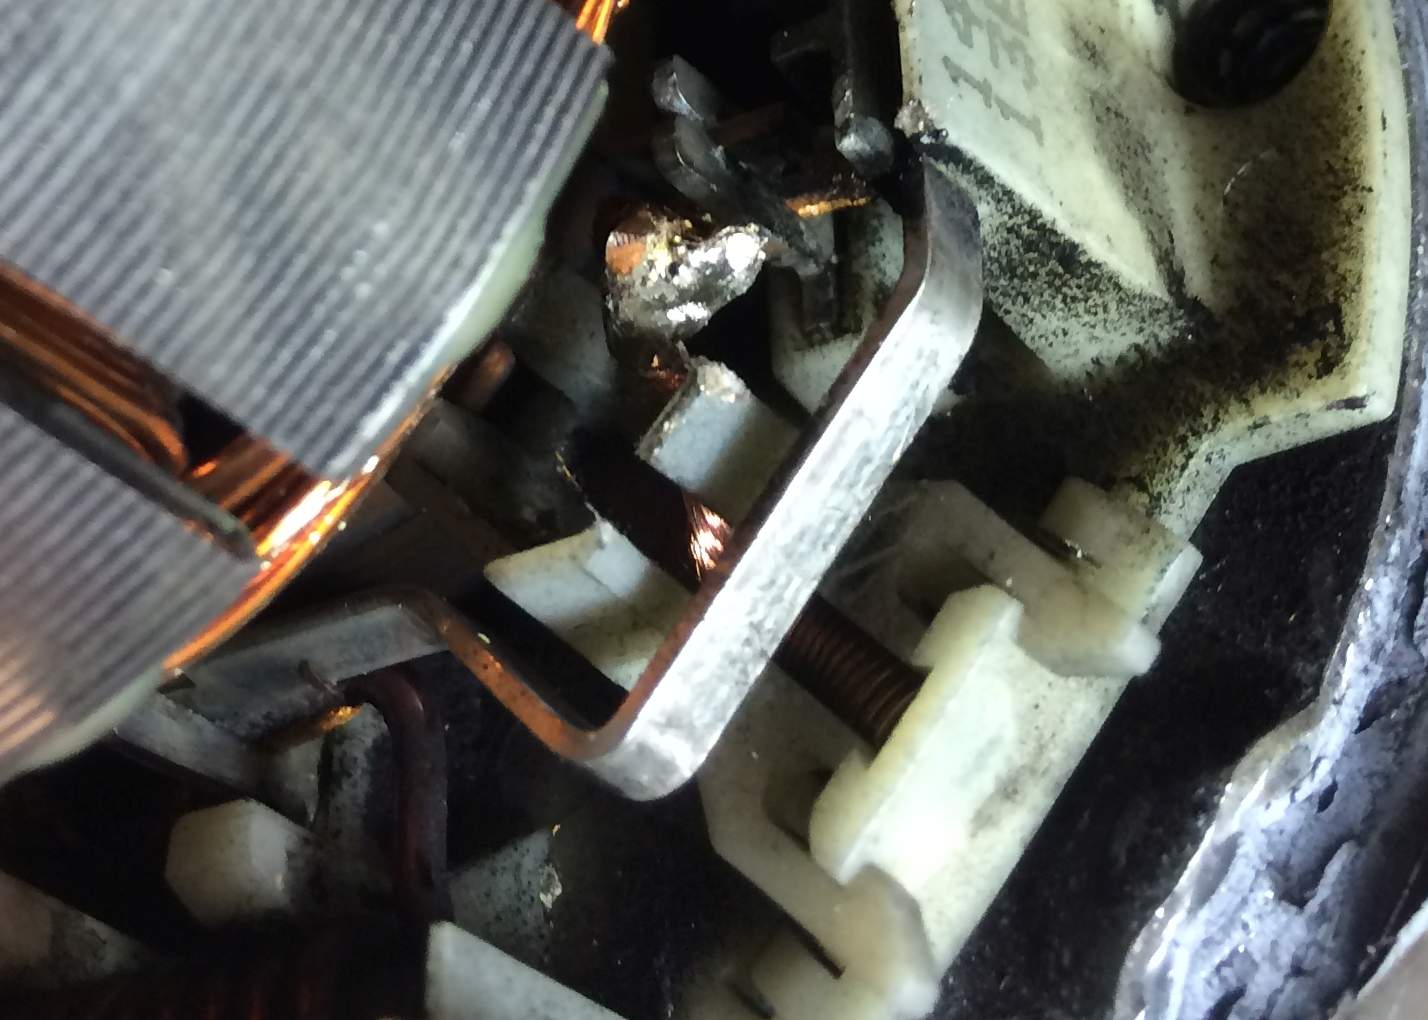
You don’t need to remove the whole ABS pump to do this test. The ABS consists of two parts: the silver piece with the brake lines connected, which is the hydraulic system with the pump motor and the black box bolted in front which contains the electronics.
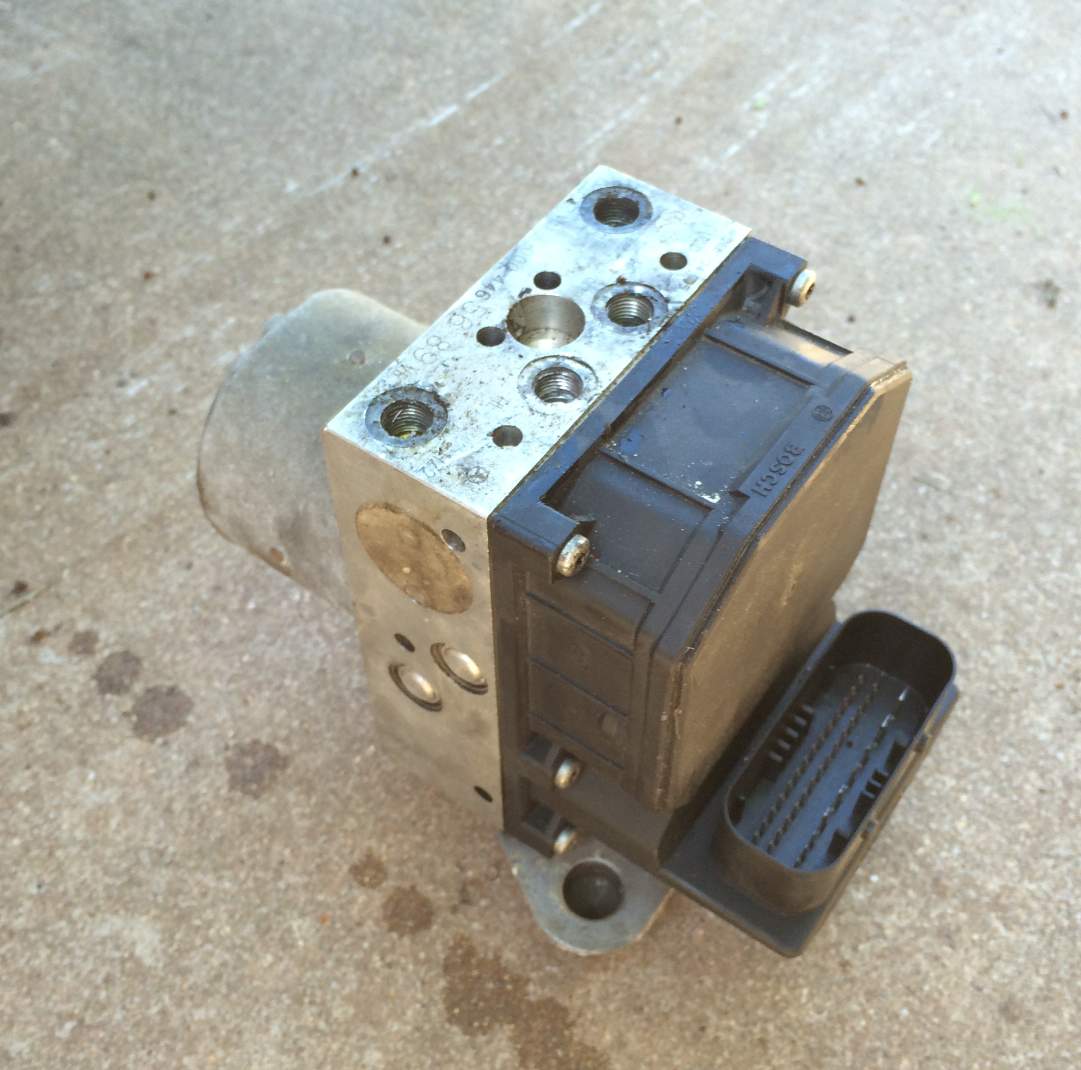
The black box is bolted on to the hydraulics with six torx screws. You can access most of those screws from either the top or through the headlight cavity. If I remember correctly only one of the bottom screws are is bit more tricky to remove. I was successful by using a small ratchet with a torx bit and accessing the screw from below. Now with the electronics part removed, you’ll see the two power connectors for the pump motor. It doesn’t matter where you apply plus and minus, the pump will run either way. The video below shows how it should sound – I took the video after I fixed the ABS pump in my Sprinter van.
If the ABS pump motor runs with an external 12V source most likely the issue is with the ABS electronics and this will be a more expensive repair (google for ABS repair, there are specialized companies that will do the repair for you). In my case, the motor didn’t work and while searching through the internet, I stumbled upon this PDF in German which explains how to fix a broken ABS motor. Turns out that the culprit was worn down carbon brushes – something that happens to most electric motors at one point in life – like the two ABS pumps that I had. All I needed to fix the ABS pump was a set of four 12 mm x 5 mm x 5 mm carbon brushes.
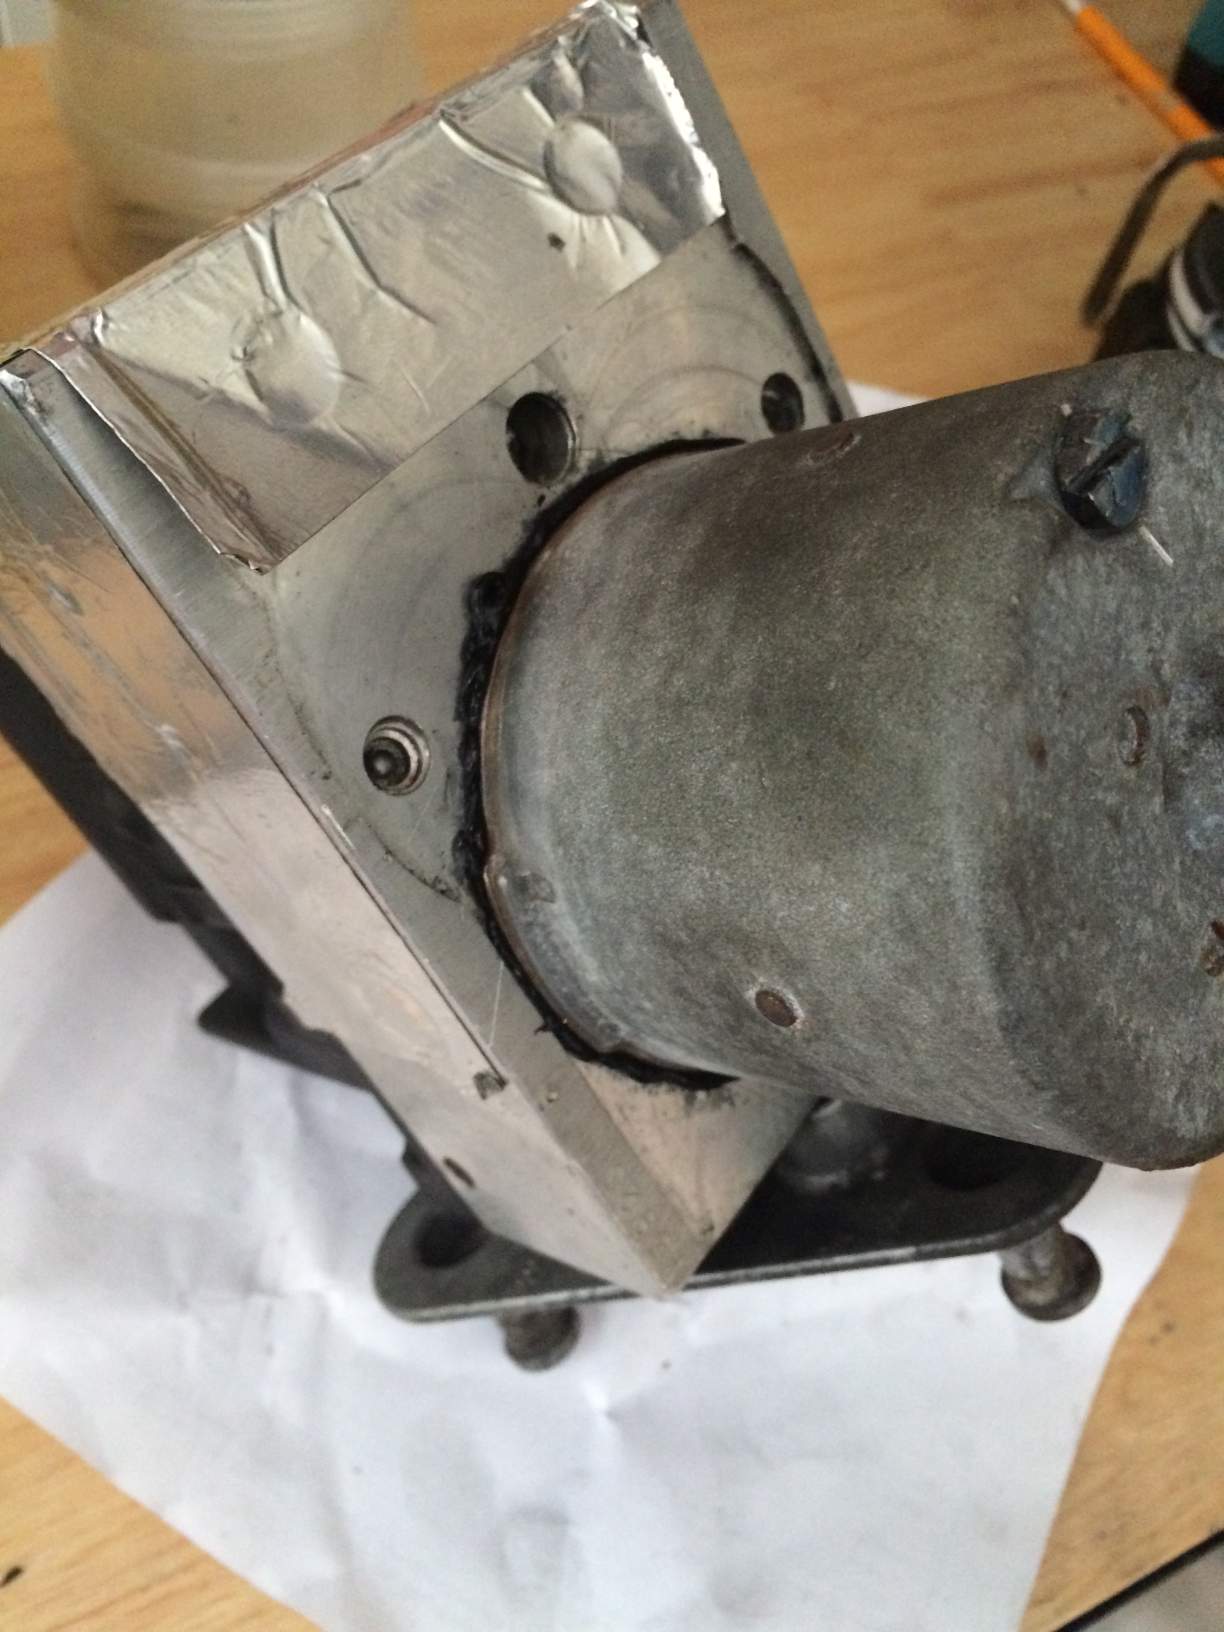
To repair the ABS pump motor you’ll need to remove the hydraulics part of the pump from the van which is done by draining the brake fluid (see the post about bleeding the brakes), removing the brake lines from the ABS pump and then lifting the pump from the base (it’s not bolted to the van anywhere, just plugged into a rubber base).
Now with the ABS pump out of the van you’ll need to take off the rotor cover on the back. It’s held on by two long screws in the back. Before you can lift of the cover you’ll need to scrape off as much of the sealant around the base as possible. Also the magnets from the motor will make it harder to lift off the cover – take your time. It will come off eventually.
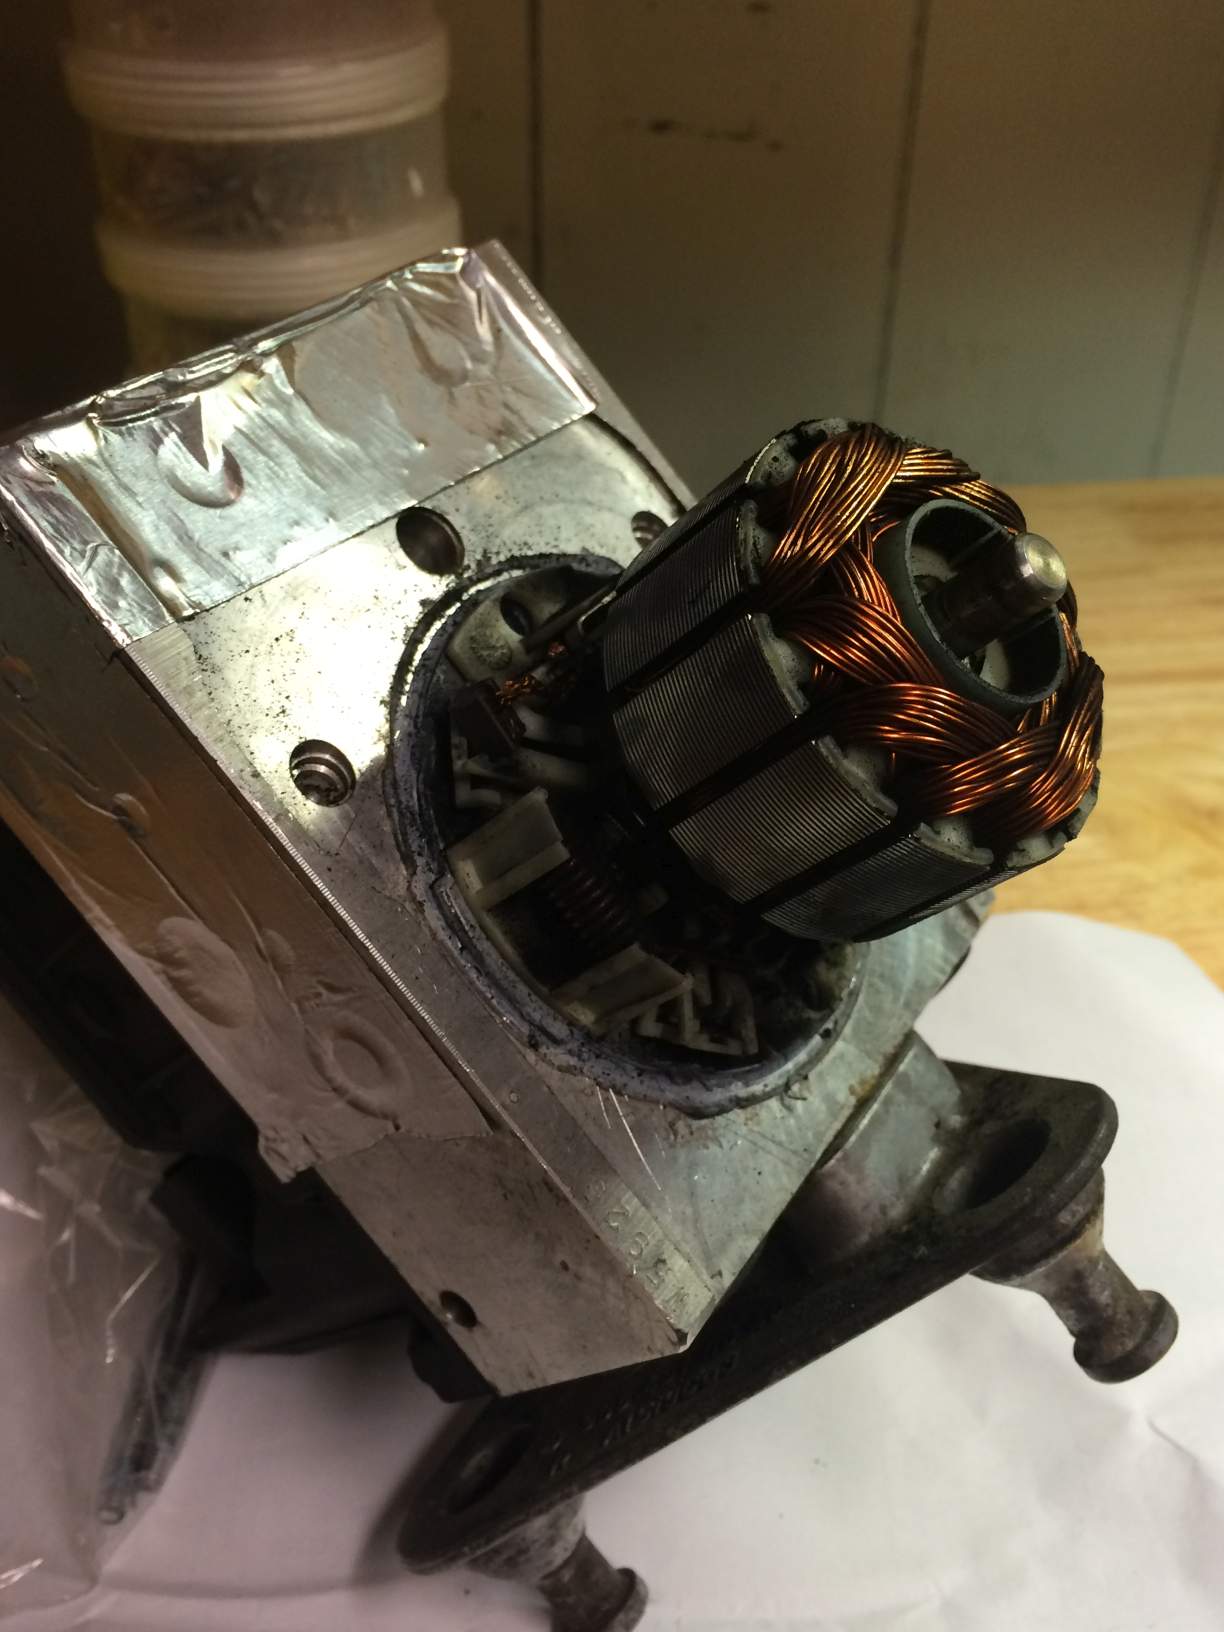
The picture above shows the rotor of the ABS pump exposed. The brushes are located at the base of the rotor and removing them is a bit tricky. They are held in place by little plastic clips. To remove the brushes you need to carefully pry the clips open. They break easily so don’t apply too much force. There’s also a little spring that pushes the brushes to the center of the rotor as they are getting shorter over time. Don’t lose these springs, you’ll need them later when installing the new brushes.
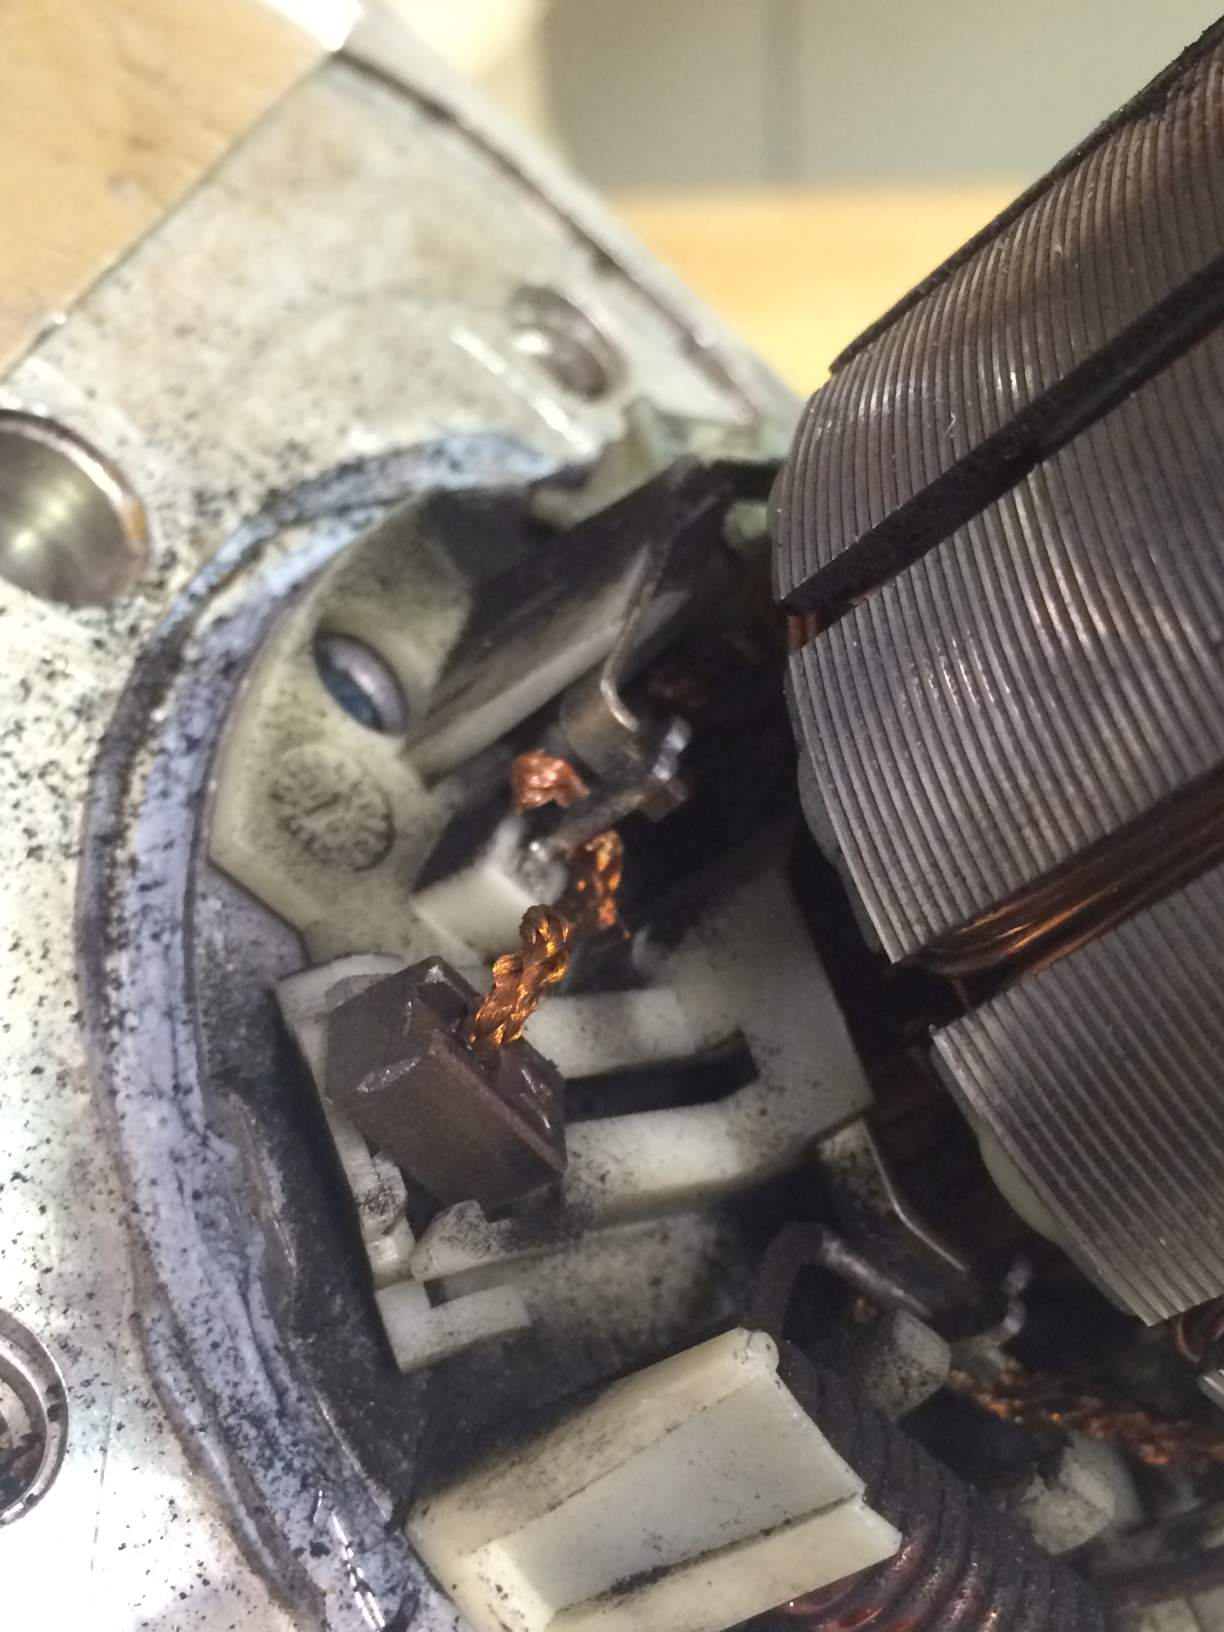
The problem why the ABS pump is not spinning anymore is that at one point the carbon brushes are worn down too much and don’t make contact with the center of the rotor anymore. Here’s how one of the old brushes looked like compared to a new one.
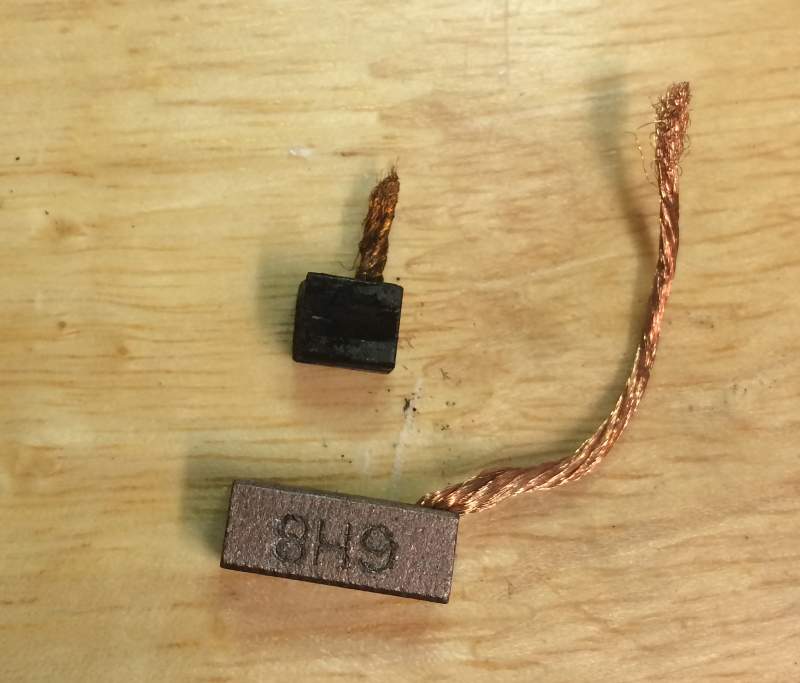
To replace a brush you’ll need to cut the wire, remove the old one and then solder the new one back to the connection, place the brush back into place with the spring and close the plastic clip. Sounds easy but since you’ll need to work with tiny pieces it’s a bit tricky (a magnifying glass helps a lot!).
After replacing all brushes, apply new sealant around the base of the cover and screw the rotor cover back on.
Cross your fingers and test the motor with an external 12V source. Ideally you should have a working ABS pump again after you installed it back in your van. Worst case you spent $20 on top of the more expensive replacement that will follow. Good luck!
Tools needed:
- Torx bit
- Soldering iron
- Wire cutter
- Magnifying glass
Parts needed:
- Four 12 mm x 5 mm x 5 mm carbon brushes. You can get a set of 20 from Amazon. They are shipped from China, so if you need them quick – you’ll pay $4.50 a piece when you buy from this store. They arrived within two days.
- Sealant
- Brake fluid
Affiliate disclosure: This site contains affiliate links to products. We may receive a commission for purchases made through these links.
-
Technical Difficulty - 5/105/10
-
Time needed - 5/105/10
-
Cost - 1/101/10
I have got issues with my ABS . I have read your post and found it most informative. I would like to thank you for doing this. Regards ,Phil.
Been thinking of scraping my van. Due to cost! But thanks to your advice! I will try this first. And hopefully get another MOT on my van for the next year or two! Many thanks! Great post.
This is a very helpful writeup. Thanks for making it. Could you please elaborate on the part where you write, “If the ABS pump motor runs with an external 12V source most likely the issue is with the ABS electronics and this will be a more expensive repair (google for ABS repair, there are specialized companies that will do the repair for you).”
Mine did run when I applied 12v. The next step will be to check wires, but I wanted to ask what you meant by that. These companies fix what exactly?
Thanks.
Mine also ran with the external 12volt.
Any luck after that?
Nice information and Write-up!!
Soldering brushes together.
I’ve found that Solder Wick braid often works to help to attach a new brush to an existing lead. Sometimes the stub end are just a bit too short and difficult to solder.
AP vic
Hello Thomas,
very interesting post.
I had the same problem on my Volvo v70…
(https://supload.com/S1kjxJNtz)
One year ago I cleaned the brush but now the problem is still there…
I’m looking for 5x5x12 carbon brush like yours…
It seems difficult for me to find them.. (because of the different posizion of the cupper cable) and your Amazon link doesn’t works anymore..
Can you write me the dealer name or somethingh else if you remember?
Thnk you
Gianni
Hi Thomas..
I would like to thank you for taking the time to post this information
I’ve had this issue with my Mercedes sprinter 311 cdi for about 11 months. I’ve asked lots of people to see if they could d the job for me but know one wanted to do so. So as I’m not a trained mechanic I wasn’t sure if I could do the job. So finally I decided that e van is coming off the road till it’s fixed. I had abs & traction control light on, occasionally they would go off. I disconnected the pipes, and took the whole thing off. Managed to get the2 little bolts out, and pulled cover off. I was confronted with a pile of carbon. I then tested the unit as in your video. Nothing was working. So followed your instructions and go new brushes. Fitted them one by one, Peugeot cover back on, tested as in video and was over the moon when it worked. Sealed it’ll backup, bought 2 new bolts and installed it back into the printer. Turned on key, lights came on, started it and for the first time I’m 11months they went out and stayed out. Weeks later and still out. It’s a tad fiddly fitting new brushes, but took my time a sorted it. To those who are think of doing the SAM, couple of tips I would give, first drain old fluid from master cylinder, and put a large tray down to catch fluids from pipes and abs pump. Definitely mark the pipes.. it’s so much easier when you come to reassemble. I had to wait for brushes to arrive, so it was about 3 days before I started to rebuild it all.
What did you use for sealant?
just some off the shelf sealant from the local car parts store. don’t remember the brand.
found the carbon brushes 5 x 5 x 12 mm. assume that you cut length to 12 mm . are these the correct brushes for 4.50 each x 4 .
Wow , I’ve got the same problem. A mechanic hinted it might be a broken cables. But after checking the voltage, looked on internet again and found you’re site. Thank you for your helpful information. Guess what I’m doing tomorrow morning. Thanks again Mike, of old England.
Hi!
Great info! Thanks!
I had the same error on my 2002 316cdi c1401/5401, and the carbon brushes was gone.
New is install and it works and the abs warning light gone of.
But i now have a new problem, my headlight goes up and down in light volume when i passes 35kmh and the engine runs ( not low iddle and not if i touch the brake pedal)
I thinking the is a abs error so when i drive tha abs motor start and stop all the time, and that takes some volt from the light and the carbon brushes burns dead quickly ?
Does anyone of you have this problem/idea to solve?
Best regards
Mr Jones
Hi Thomas,
I’m looking at buying a Sprinter with faulty ABS and found this very informative and well written.
Thankyou for taking the time to do this.